Introduction to Crème Brûlée
Crème Brûlée, a sweet treat that dances on the tongue, holds a special place at fine dining tables. This classic dessert isn’t just loved for its rich flavor but also for its unique texture, which brings us to an important component: the crust. Understanding how to make a crème brûlée crust with finesse is essential for any budding chef or dessert aficionado.
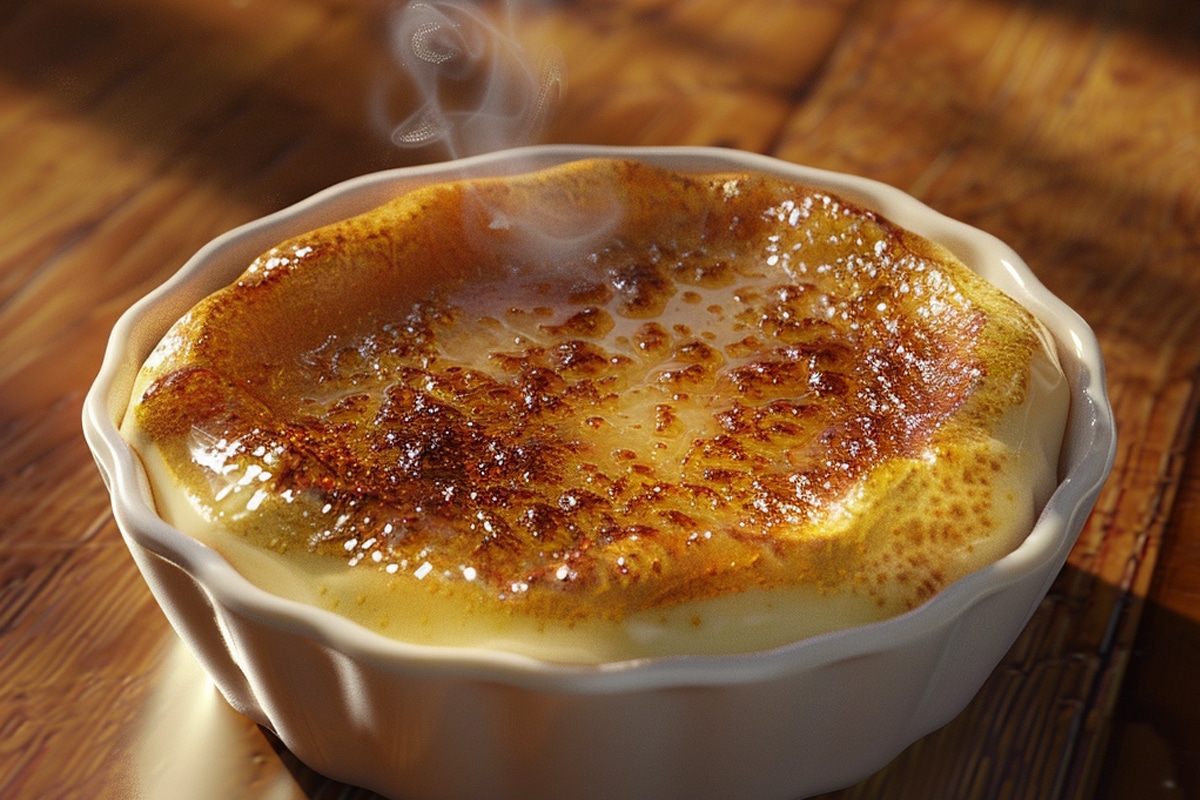
What is Crème Brûlée?
At its heart, Crème Brûlée is a symphony of simple ingredients that come together to form something truly magical. Comprised of cream, eggs, sugar, and vanilla, this dessert might sound straightforward, but the real magic happens in the execution. Once baked, it’s topped with a thin layer of sugar that is then caramelized to create a crispy top layer. This golden shield not only offers a textural contrast but also a warm, rich flavor that perfectly complements the silky custard beneath.
Importance of the Crust in Crème Brûlée
The crust in Crème Brûlée isn’t just a garnish; it’s an integral part of the dessert’s identity. Achieving that perfect brittle crust that cracks beautifully under the tap of a spoon is what sets a great Crème Brûlée apart from a good one. This caramelized sugar topping creates an exciting sensory experience that starts from the very first bite. Moreover, the crust serves as a delightful contrast to the creamy custard below, balancing the dessert’s sweetness and texture.
Creating a flawless crème brûlée crust does more than just impress your guests; it transforms the dessert into an event. Every spoonful brings a mix of creamy and crunchy textures that are not only delicious but also deeply satisfying. Hence, mastering the crust is key to the art of making a memorable Crème Brûlée.
Ingredients and Tools Needed
When embarking on the journey to create the perfect crème brûlée crust, having the right ingredients and tools at your disposal is crucial. This section will guide you through selecting the essential components that make all the difference. By the end, you’ll be equipped not only with knowledge but also with the confidence to execute this dessert flawlessly.
Essential Ingredients for the Perfect Crust
To achieve the iconic, caramelized top of a crème brûlée, a few key ingredients are essential. First and foremost, the type of sugar you use can dramatically affect the outcome. Granulated sugar is the most common choice, as it melts and caramelizes evenly, creating a smooth, glossy finish. However, some chefs prefer using demerara or turbinado sugar for a deeper flavor and a slightly crunchier texture.
Besides sugar, the other component of the crust is heat, which isn’t an ingredient per se, but it’s just as important. The precise application of heat transforms the sugar into the signature golden shell that crème brûlée is famous for. Now, let’s turn our attention to the tools that make this transformation possible.
Choosing the Right Culinary Tools
The tool most synonymous with making crème brûlée is the kitchen torch. A torch allows you to precisely direct heat onto the sugar, ensuring it caramelizes perfectly without affecting the delicate custard underneath. For those looking to invest in a kitchen torch, options range from compact butane torches to more robust propane versions. The choice depends largely on personal preference and frequency of use.
In addition to a torch, having the right dish is important. Ramekins—small, usually ceramic, dishes—are traditional for crème brûlée because they withstand high temperatures and distribute heat evenly. Ensure your ramekins are broiler-safe if you prefer using an oven broiler to caramelize the sugar.
With the right ingredients and tools, you’re all set to tackle the crème brûlée crust with gusto. Remember, practice makes perfect, and each attempt brings you closer to mastering this beloved dessert. For further reading on choosing the best kitchen torch for your needs, check out this detailed guide.
Step-by-Step Guide to Making the Crust
Creating the perfect crème brûlée crust is an art that requires precision, patience, and a bit of culinary flair. This step-by-step guide will walk you through the process, from preparing the base to the final, satisfying crack of the caramelized sugar. So, let’s get started on this delightful journey to dessert perfection.
Preparing Your Crème Brûlée Base
Before you even think about the sugar crust, your crème brûlée base needs to be impeccable. Begin by gently heating heavy cream with a vanilla pod split down the middle, allowing the vanilla to infuse the cream with its rich flavor. Next, whisk yolks with granulated sugar until the mixture is light and creamy. Gradually pour the warm cream over the yolks, stirring constantly to prevent curdling. Strain this mixture into ramekins, then bake in a water bath until just set. The key here is a custard that is smooth and firm enough to support the sugar layer that will become your crust.
Applying the Sugar Layer
Once your custard is cooled and set, it’s time to apply the sugar. Sprinkle a thin, even layer of fine sugar over the surface of each custard. The sugar layer should be just enough to cover the custard but not so thick that it won’t caramelize evenly. This is crucial because an uneven layer can lead to a burnt or under-caramelized crust.
Techniques for Caramelizing the Sugar
The transformation of simple sugar into a shimmering, crackly crust is nothing short of culinary magic. Here are some techniques to achieve that perfect caramelization.
Using a Culinary Torch
A culinary torch is the most direct method to caramelize the sugar. Hold the torch about six inches away from the sugar, moving it around constantly to avoid burning the sugar. The flame should lightly kiss the surface, melting the sugar into a deep amber crust. This method gives you control over the caramelization process and typically results in a uniformly crisp layer.
Alternative Methods: Broilers and Irons
If you don’t have a torch, the broiler in your oven is an excellent alternative. Place the ramekins under the broiler, watching closely as the sugar melts and begins to brown. This method requires vigilance to prevent the sugar from burning.
Another traditional tool is a heated iron, used in some European kitchens. The iron is heated over a stove and then pressed onto the sugar, quickly caramelizing it. This method is less common but can produce a beautifully even crust if done correctly.
Common Mistakes and How to Avoid Them
Making a crème brûlée crust might seem straightforward, but even the most experienced chefs can run into a few hiccups along the way. In this section, we’ll explore some common mistakes and provide practical tips to help you avoid them, ensuring your crème brûlée turns out perfectly every time.
Avoiding a Bitter Taste
One of the most common disappointments in making a crème brûlée crust is ending up with a bitter taste. This bitterness usually occurs when the sugar is overheated and starts to burn. To avoid this, it’s crucial to watch the sugar closely as it caramelizes. Make sure you use a medium flame and keep the torch moving in small, circular motions rather than letting it sit too long in one spot. If using a broiler, keep the ramekins near the middle of the oven and monitor them closely, rotating if necessary to ensure an even caramelization.
Another tip is to choose the right type of sugar. While granulated sugar is most commonly used, ensuring it is fresh and of good quality can make a difference. Old or poor-quality sugar can sometimes cook unevenly or burn at a lower temperature, contributing to a bitter taste.
Ensuring Even Caramelization
Even caramelization is key to a perfect crème brûlée crust. Uneven caramelization not only affects the texture and taste but also the visual appeal of your dessert. To achieve an even layer, ensure the sugar is spread uniformly over the custard. A small sieve can help distribute the sugar evenly.
When using a torch, keep it moving at all times and maintain a consistent distance from the sugar layer. This method prevents hot spots from forming and ensures that every part of the sugar layer melts and browns at the same rate. If you are using a broiler, position the ramekins so that each one receives equal heat, and turn them halfway through if your broiler cooks unevenly.
For those who prefer a tool more traditional than a torch, a heated iron, commonly used in professional kitchens, provides quick and even caramelization. This tool requires practice but can give your desserts a uniformly smooth and glossy crust.
Advanced Tips and Tricks
Mastering how to make a crème brûlée crust is a delightful challenge for many dessert enthusiasts. In this section, we delve into some advanced techniques that can help ensure a consistently crisp layer and explore creative variations that can set your dessert apart from the classic version. Whether you’re a seasoned chef or a baking enthusiast, these tips will elevate your crème brûlée to new heights.
Achieving a Consistently Crisp Layer
Consistency is key to creating the perfect crème brûlée crust. One advanced tip is to ensure your sugar layer is as even as possible. Use a fine sieve to sprinkle the sugar, which helps distribute it uniformly across the custard’s surface. Before you begin caramelizing the sugar, let it sit for a few minutes. This allows the sugar to settle and adhere better to the custard, which prevents it from sliding off during caramelization.
Temperature control is crucial. Whether using a torch or a broiler, keeping a consistent distance and heat level will prevent hot spots and ensure that the entire sugar layer caramelizes at the same rate. If using a torch, keep it moving in a slow, circular motion rather than holding it in one spot. This method evenly distributes the heat and gives you a golden, glossy finish without burning the sugar.
Creative Variations on the Classic Crust
Once you’ve mastered the classic crème brûlée crust, why not experiment with some creative twists? One popular variation is to infuse the sugar with citrus zest before caramelizing. Lemon, lime, or orange zest can add a refreshing twist to the rich dessert. Simply mix the zest with the granulated sugar and let it dry slightly before sprinkling it over the custard.
Another exciting variation is using different types of sugar. For instance, coconut sugar or maple sugar can provide a unique flavor profile that complements the vanilla custard beautifully. These sugars not only add a distinct taste but also caramelize differently, giving you a slightly different texture that can surprise and delight your palate.
For those who enjoy a bit of texture, adding a thin layer of finely chopped nuts or toasted coconut flakes to the sugar before caramelizing offers a delightful crunch and a nutty flavor that pairs wonderfully with the smooth custard.
FAQs: Expert Answers to Common Queries
Navigating the intricacies of making a crème brûlée crust can stir up a few questions. This section addresses some common queries with expert advice, ensuring that your dessert crafting is as smooth and successful as possible.
What is the Best Sugar for a Crème Brûlée Crust?
Choosing the right sugar can make a significant difference in your crème brûlée crust. Granulated sugar is the most commonly used because it melts and caramelizes evenly, creating a smooth, glossy finish. However, for a deeper flavor and a slightly crunchier texture, many pastry chefs recommend using superfine sugar. It melts quicker and more evenly, providing a consistent caramel layer. Another alternative is demerara sugar, which gives a richer, molasses-like flavor and a crunchier texture. Each type of sugar brings its own unique qualities to the crust, so you might want to experiment to see which meets your taste preferences best.
Can I Caramelize the Sugar Without a Torch?
Yes, you can caramelize sugar without a torch. Although a torch gives you more control over the caramelization process, using your oven’s broiler is an effective alternative. Simply sprinkle the sugar over your set custard and place the ramekins under the broiler. Watch closely and rotate the ramekins to ensure even caramelization. This method requires vigilance to prevent the sugar from burning but can yield a beautifully caramelized top. Another less common method is using a hot iron, which is heated on the stove and then pressed onto the sugar layer, quickly caramelizing it. This method is traditional in some European kitchens and can be quite effective.
How to Fix a Runny Crème Brûlée Before Caramelizing?
If your crème brûlée base is too runny, there are a few steps you can take to fix it before caramelizing the sugar. First, ensure that the custard is fully set by baking it a bit longer. Sometimes, custards haven’t quite reached the right consistency because of oven temperature variations. Make sure to use a water bath, as it helps cook the custard gently and evenly. If the custard is still runny after additional baking, it might be due to the proportion of ingredients. Double-check your recipe to make sure the ratio of eggs to liquid is correct. Too much liquid can result in a runny custard. Cooling the custard in the refrigerator for several hours can also help it set before you add the sugar layer.
Conclusion
As we wrap up our detailed exploration of how to make a crème brûlée crust, let’s reflect on the key points and encourage a spirit of culinary experimentation that can lead to delightful discoveries in your kitchen.
Recap of Key Points
We’ve journeyed through the essentials of selecting the right ingredients and tools, understanding the step-by-step process of preparing the base, applying the sugar, and mastering the caramelization techniques. Key tips included the importance of using fine sugar for smooth caramelization and maintaining even heat when using a torch or broiler. Additionally, we covered how to troubleshoot common issues such as a runny base or a bitter taste, ensuring every aspect of your dessert turns out perfectly.
Encouragement to Experiment Crème Brûlée Crust
Now that you are equipped with the foundational knowledge and practical tips on making a crème brûlée crust, why not push the boundaries? Experiment with different sugars like turbinado or muscovado for varied flavors and textures. Consider infusing your custard with unique elements such as lavender or cardamom for a twist on the traditional vanilla. Each variation not only enhances your skills but also adds a personal touch to this classic dessert. For a truly unique take on this dessert, you might find inspiration in a luxurious variation like the Crab Brûlée, which combines seafood and classic techniques for a surprising twist.
Embrace the trials and errors as part of the learning process. Remember, every attempt brings you closer to perfecting your technique and perhaps even developing a signature version of this beloved dessert. Whether you stick to the traditional methods or venture into new culinary territories, the joy of creating something delightful for yourself and others remains a rewarding experience.
Thanks for accompanying me on this gastronomic journey. Keep experimenting, keep learning, and most importantly, keep enjoying the art of dessert making!