How to caramelize Brulee is a crucial technique in dessert making that can elevate a simple dish to a spectacular finale in a fine dining experience. Caramelization, the process where sugar breaks down under heat, imparts a rich flavor and color to food, making it a key step in preparing many beloved desserts. Whether it’s creating the perfect golden crust on a crème brûlée or adding a sweet, crunchy topping to a tart, mastering caramelization can transform your dessert presentations. This introduction will explore various methods and tips for achieving flawless caramelization, ensuring your sweets are not only delicious but visually stunning as well.
Understanding Crème Brulee
The History and Origin of Crème Brûlée
Crème brûlée, a dish as intriguing as its history, sparks curiosity. So, where did this creamy dessert begin? Historically, it’s believed to have originated in France during the 17th century, although similar recipes predate this in other cultures. This culinary delight, also known as ‘burnt cream’ or ‘Trinity cream’ in England, was first documented in François Massialot’s cookbook in 1691. This dessert not only highlights the sophistication of European desserts but also showcases the evolution of culinary arts over centuries.
Key Ingredients and Tools Needed for Perfect Caramelization
Achieving the signature caramelized top of a crème brûlée requires both precision in ingredients and tools. First, let’s discuss the essentials: heavy cream, vanilla beans, eggs, and sugar. Each component plays a pivotal role. The vanilla adds a subtle depth, while the cream and eggs create the velvety custard base. Now, how to caramelize brulee? This is where the right tools come into play.
Importance of Choosing the Right Type of Sugar
Choosing the right sugar can make or break your crème brûlée. Granulated sugar is a go-to for many chefs due to its ability to melt evenly and quickly, forming a perfect golden crust. However, others swear by finer sugars, like caster, for a smoother finish. Remember, the sugar not only impacts flavor but also your caramelization success!
Culinary Tools: Torches vs. Broilers
When it comes to tools, the torch is synonymous with crème brûlée. It allows precise control over the heat application, ensuring a beautifully crisp layer without overheating the custard beneath. Alternatively, a broiler can be used, especially for larger batches. While broilers offer convenience, they lack the finesse of a torch. Whichever method you choose, ensure even heat distribution for that flawless finish.
Preparing Your Crème Brûlée
Crème Brûlée, a luxurious dessert known for its rich custard base and caramelized sugar topping, is a delight for any sweet tooth. Today, we’ll dive into the process of creating this classic French dish, focusing specifically on how to caramelize brulee, ensuring a perfect finish every time.
Step-by-Step Guide to Making the Custard Base
Creating the custard base is the first step in your crème brûlée adventure. Begin by gathering quality ingredients: fresh cream, vanilla beans, egg yolks, and sugar. First, preheat your oven to 325°F. Split the vanilla beans lengthwise and scrape out the seeds. Combine these seeds with the cream in a saucepan, heating it gently until it’s hot but not boiling.
In a separate bowl, whisk the egg yolks with sugar until the mixture turns pale and thick. Now, gradually pour the hot cream into the yolk mixture, stirring constantly to avoid cooking the eggs. Strain this mixture to remove any lumps and pour it into ramekins. Set these in a baking dish and fill the dish with hot water halfway up the sides of the ramekins. Bake until the custard is set but still trembles in the center, about 40 to 45 minutes. After baking, chill the custards in the refrigerator for at least two hours.
Tips for Ensuring Smooth and Creamy Texture
Achieving a smooth and creamy texture in your crème brûlée is crucial, and here are a few tips to ensure it. Firstly, always use room-temperature ingredients to prevent the custard from becoming too stiff. Secondly, when combining your yolks and sugar, whisk them until they’re just blended; over-whisking can incorporate too much air, which might cause the custard to puff up and deflate. Lastly, bake your custard at a gentle temperature to prevent bubbles from forming, ensuring the custard cooks evenly without curdling.
The Caramelization Process
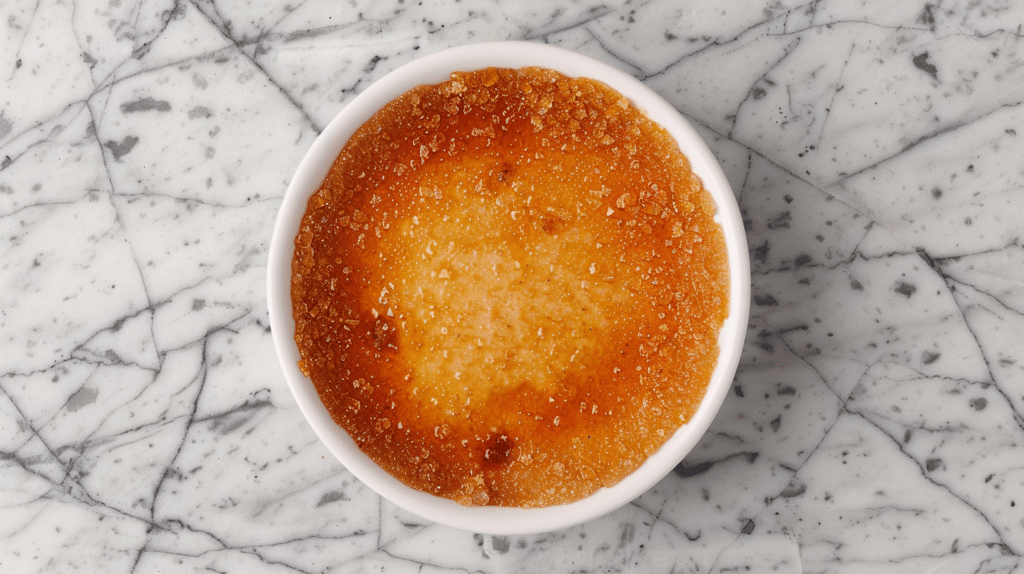
Caramelizing sugar is a culinary art that transforms simple sugar into a golden delight, perfect for topping off a classic brûlée. But, what exactly is this process? It involves heating sugar until it melts and browns, creating a rich flavor and color. This process is crucial for achieving the iconic, crisp top of a crème brûlée that contrasts so beautifully with its creamy base. Let’s delve into how you can master this technique at home and make your brûlée a dessert to remember.
Techniques for Evenly Spreading Sugar
Spreading sugar evenly over your brûlée is the first step toward perfect caramelization. Begin by sprinkling a thin, even layer of fine sugar across the surface of the custard. The key here is consistency; uneven sugar can lead to patches that are either burnt or under-caramelized. For an even layer, use a spoon or a small sieve to distribute the sugar, and gently shake the ramekin to settle the layer. This method ensures that every bite has just the right amount of sweet, caramelized goodness.
Detailed Guide to Using a Culinary Torch
Using a culinary torch is the most exciting part of making a brûlée. It’s not only fun but also allows precise control over the caramelization.
Optimal Distance and Angle for Torching
When you’re ready to torch, hold the flame about 6 inches away from the surface. This distance is ideal because it melts the sugar without burning it too quickly. Angle the torch slightly, moving it in a slow, circular motion. This technique helps heat the sugar uniformly, achieving a gorgeously smooth and glossy caramel layer. Remember, patience is key! Skipping this part hastily may result in an unpleasantly bitter flavor.
Safety Precautions When Using a Torch
Safety always comes first, especially when handling a culinary torch. Always keep the torch pointed away from yourself and others. Ensure there are no flammable materials nearby, and use the torch in a well-ventilated area to avoid inhaling any fumes. After using, always turn it off and let it cool before storing. These precautions will keep you safe and make your cooking experience enjoyable.
By understanding the caramelization process and mastering the use of a culinary torch, you’re well on your way to perfecting how to caramelize brulee. Remember, practice makes perfect, and soon you’ll be topping off your desserts like a pro. Happy cooking!
Alternative Methods to Caramelize
Caramelizing sugar transforms simple desserts into masterpieces of taste and texture. Today, we’ll delve into how to caramelize brulee, a technique that elevates this classic dessert to new heights. This guide offers detailed steps and innovative methods to ensure your success in the kitchen.
How to Use a Broiler for Caramelizing Crème Brûlée
Caramelizing the top of a crème brûlée under a broiler is a quick and effective method. Firstly, ensure that the custard is completely cool and firm. Dust the surface lightly and uniformly with granulated sugar Then, place the ramekins under a preheated broiler. Watch closely! The sugar will start to melt and then quickly turn into a rich, golden caramel. Remove the dishes as soon as the desired color is achieved. This method gives you control over how dark you prefer your caramel, enhancing the final flavor of your dessert.
Also: How to Make a Crème Brûlée Crust? Perfect Your Dessert!
Experimenting with Different Sugars for Unique Flavors
Venturing into the world of sugars can turn your crème brûlée into an exploration of flavors. Each sugar type brings its own color, taste, and texture to the caramel.
Benefits of Using Demerara or Muscovado Sugar
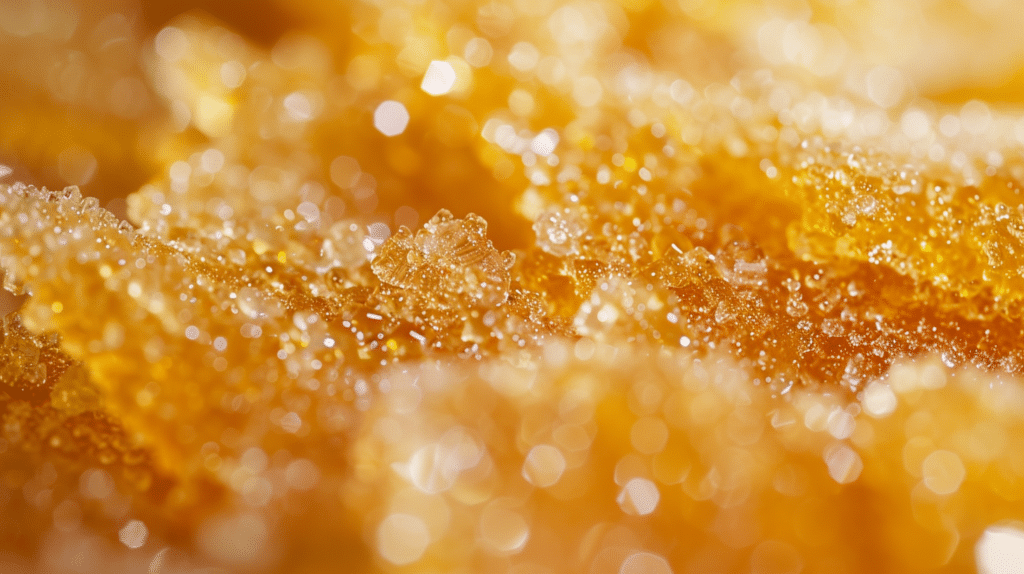
Using Demerara or Muscovado sugar takes your caramel to a whole new level. These sugars are less refined, meaning they retain more natural molasses. This imparts a deeper, more complex flavor compared to regular white sugar. Demerara sugar melts and caramelizes beautifully, giving a crunchier texture. Muscovado sugar, on the other hand, offers a moist, sticky quality with a strong molasses flavor that complements the creamy texture of crème brûlée.
Mastering how to caramelize brulee isn’t just about following steps; it’s about understanding the ingredients and the impact they have on your dessert. This insight is crucial for anyone looking to enhance their culinary skills and impress with every spoonful.
Advanced Caramelizing brulee Techniques
Caramelizing sugar is an art that transforms the simplest ingredients into a golden, delicious crust, often seen in desserts like crème brûlée. This process, when mastered, can elevate your dessert from good to unforgettable. Below, we delve into advanced techniques that ensure you achieve that perfect caramelization every time.
Creating the Perfect Golden Crust
Achieving the perfect golden crust on your brûlée isn’t just about taste; it’s about crafting a sensory experience. Start by selecting the right type of sugar; granulated sugar is your best bet because it melts evenly, creating a smooth and uniform layer. The key here is even heat distribution. Use a small torch to gently sweep across the surface in slow, even motions. This technique prevents hot spots that can cause the sugar to burn instead of caramelizing.
Remember, the color you’re aiming for is a rich amber, not dark brown. Once you see that golden hue forming, stop torching immediately to avoid a bitter flavor. This method not only gives your brûlée that signature crackle but also imparts a subtly smoky essence that’s hard to resist.
Avoiding Common Pitfalls in Sugar Caramelization
Even seasoned chefs can encounter hiccups when caramelizing sugar. Here are some guidelines to avoid typical errors:
- Temperature control: Too high heat can turn your sugar from caramel to carbon in a blink. Always start low and increase the heat gradually.
- Consistent layering: An uneven layer of sugar can result in patches that are overly caramelized and others that are underdone. Spread the sugar uniformly before you begin torching.
- Humidity watch: Sugar absorbs moisture from the air, which can make it clump and harden. On humid days, consider using a dehumidifier in the kitchen or work quickly to avoid moisture buildup.
For more in-depth tips and techniques, visit Culinary Arts Institute and start perfecting your caramelizing skills today!
Serving and Presentation Tips
Creative Ways to Garnish Your Crème Brûlée
Garnishing your crème brûlée not only enhances its visual appeal but also adds a touch of flavor that complements the creamy dessert. Fresh berries, such as raspberries or blueberries, lend a refreshing zest and a splash of color. A sprig of mint or a dusting of powdered sugar can also elevate the presentation. For those who enjoy a bit of texture, a few brittle pieces of caramel or a light sprinkling of toasted coconut can add a delightful crunch.
Pairing Suggestions for Enhanced Dining Experience
Pairing your crème brûlée with the right beverage can enhance the overall dining experience. Opt for a cup of strong coffee or a glass of chilled dessert tea. The robust flavors of coffee or the subtle sweetness of tea balance the richness of the dessert. If you’re serving crème brûlée at a brunch, a sparkling apple cider makes a festive, non-alcoholic pairing that complements the sweet caramelized top.
When serving, consider the setting. A simple, elegant plate can make a significant impact. Use a warm plate to ensure the dessert stays creamy. Don’t forget to place your crème brûlée under a broiler to get that perfect caramelization just before serving. This last-minute preparation captures the essence of the dessert, ensuring a warm, crispy top contrasted by the cool, creamy custard beneath.
In mastering how to caramelize brûlée, your technique is crucial. Ensure your sugar layer is even for uniform browning. A kitchen torch is the best tool for this, giving you control over the heat application. Move steadily and don’t linger too long in one spot to prevent burning. The sugar should melt and turn a rich amber color—this is when it’s just right.
By enhancing your presentation and serving techniques, you make each bite of crème brûlée an experience to remember. Whether it’s the garnish, the pairings, or the plate, each element plays a part in crafting an unforgettable dessert.
Also: Crab Brulee Recipe: A Luxurious Twist on Classic Crème Brûlée
FAQs about Caramelize Brulee
Caramelizing crème brûlée transforms a delightful custard into an extraordinary dessert with a perfectly golden, crackable sugar top. Understanding the process ensures a spectacular finish every time. Let’s explore how to achieve that irresistible crunch.
How do I ensure even caramelization across the surface?
Achieving even caramelization is more straightforward than it sounds. First, sprinkle a uniform layer of sugar over your cooled custard. The sugar should thinly coat the entire surface; too much can result in a thick, hard crust, while too little might not cover the custard evenly. Next, hold your torch at the right angle — typically about a 45-degree angle works best. Move the flame in a slow, steady pattern, ensuring not to linger too long in any area. This method prevents hot spots and ensures a beautifully golden top that’s music to the ears with each tap of the spoon.
Can I caramelize brulee without a torch?
Yes, indeed, you can caramelize crème brulee even if you don’t have a torch. An alternative is using your oven’s broiler. Place your ramekins under the broiler, keeping a keen eye on them, as the sugar will caramelize quickly. It usually takes about 2-3 minutes, but watch closely to avoid burning. This method can be slightly less precise than using a torch, but with practice, it provides a similarly satisfying result.
How long should I torch the sugar for optimal results?
Torching the sugar should be a quick process. Generally, it takes about 30 seconds to a minute to get that perfect amber hue. Start by torching the outer edges and gradually spiral into the center. The sugar will start melting and bubbling. Once it begins to brown, keep the torch moving to avoid burning the sugar. The key is to achieve a rich caramel color; as soon as you see this, stop torching to avoid a bitter flavor.
Conclusion
Crafting the perfect caramelized brulee is both an art and a science. This article delves into the nuances of this culinary technique, ensuring that even beginners can achieve success. Whether you are a seasoned chef or a home cook eager to impress, understanding how to caramelize brulee effectively will elevate your dessert game to new heights.
Summary of Key Points
- Understanding Caramelization: Caramelization is the process of cooking sugar until it becomes a deep amber liquid. For brulee, this technique not only enhances flavor but also creates that signature crispy top layer that is both delicious and visually appealing.
- Tools and Ingredients: To caramelize brulee, you will need granulated sugar, a torch, and a watchful eye to avoid burning the sugar. Precision in timing and temperature is crucial.
- Technique Mastery: It involves evenly sprinkling sugar over the custard and then using a torch to gently melt and brown the sugar. Moving the torch continuously ensures an even caramelization without burning.
Encouragement to Experiment and Perfect the Technique
Caramelizing brulee is a technique that can be refined with practice. Each attempt provides a new opportunity to perfect your approach. Don’t shy away from experimenting with different sugar types or torching techniques. Each batch of brulee offers a chance to hone your skills, and even the less-than-perfect results will be a learning experience. Remember, the journey to mastering how to caramelize brulee is as rewarding as the dessert itself!